Tuesday, August 3, 2010

summer cocktails


kate (brooklyn)


As a child I grew up on whiskey sours. Well, okay, not really, but they were always around at my grandparents' house for the grown-ups on Sunday afternoons. The minute we would walk into my grandparents' home, my grandfather, "Pops," would have a drink ready for my father and anyone else who was not the designated driver for the night. There would even be batches chilling on the porch in the winter if the fridge was too full. Don't get me wrong, I tried little sips here and there but thought it was pretty gross at the time. I would make my own "Shirley Temple" with ginger ale and cherry juice and go into the TV room and pretend to watch PBS, while I really watched MTV. My grandfather made his drink with sweet and low and a few other mystery ingredients... it was quite an art. Branden and I served them at our wedding this past summer in two containers: one labeled "whiskey sours" and the other labeled "swiskey wours." I bet you can guess which one would knock your socks off. I think Pops would have been proud.

A few months ago, Kris and I decided it would be fun to try a seasonal cocktail post using fruits and vegetables from our CSAs. In this past week's share we received a bunch of cucumbers and sprigs of basil, among many other delicious veggies. Recently I came across
Lillet one night at a bar in our neighborhood called Five Leaves. It was a lovely digestif. I shared my newfound love of Lillet with my family recently when they came to visit NYC and it was the perfect aperitif after a long day of sightseeing and walking around the city.

So, for this post I decided to make a Lillet-inspired cocktail with some summertime ingredients. I set the basil, cucumber, gin, Lillet, ice cube tray, etc. neatly out on the counter. And then I realized I did not own a cocktail shaker. Hmm... I thought about shaking a glass and covering it with my hand or putting it in the
French press and swishing it around... then I found it. My Klean Kanteen water bottle. Hey, it wasn't perfect, but it did the trick. The basil and cucumber really add a little "je ne sais pas." (Okay, I had to add a little bit of French in there somewhere.) Enjoy!

(Above photos l to r: Makeshift cocktail shaker; One lillet-basil cocktail)


lillet-basil cocktail

Adapted from
MarthaStewart.com
Serves: 1

1 cup ice, plus more for serving
1/2 cup Lillet Blanc
1 ounce (2 tablespoons) gin
2 tablespoons fresh orange juice
1/4 cup loosely-packed fresh basil leaves, plus sprigs for garnish
Splash of tonic water
1 cucumber spear, for garnish
1 cinnamon stick, for garnish

Put ice, Lillet, gin, orange juice, and basil in a cocktail shaker and shake well. Fill a glass with ice and strain mixture into glass. Add tonic water. Garnish with cucumber spear, cinnamon stick, and basil sprigs.

(Above photo: Fresh basil sprigs and Lillet Blanc)


kristen (beacon)

Summertime in Beacon is magical.

I've heard my fair share of cricket songs, being from the South and all, but in Beacon they seem to chirp and hum the happiest. A full July moon rising over Mt. Beacon is a sight like no other, and during storms on hot nights the thunder rolls down the mountain and seeps into our bones.

Amidst that abundance of seasonal inspiration, our local farms and home gardens are also teeming with summertime offerings. Like bright, pink watermelon. And aromatic (and quintessentially summery) basil. And cool, crisp cucumbers.

Luckily, I had all of these treats on-hand when embarking on this little cocktail experiment. Our CSA,
Common Ground Farm, provided the gorgeous watermelon and sunny lemon cucumbers. Some sweet neighbors (Esther and Gordon) provided the fresh basil (as ours was devoured by a mysterious pest).

The cocktail, which I have very affectionately named, is a breeze to make, as it requires no fancy cocktail-making equipment. It's bright and fresh, not unlike Beacon in summer.

(Above photos l to r: Watermelon from Common Ground Farm; Gin, infusing)


the beacon summer

Serves: 2

Infused gin (see recipe below)
Handful of fresh watermelon dices, lemon cucumber slices, and basil leaves
Tonic (look for a brand made without high fructose corn syrup, like
Q Tonic)
Honey,
agave nectar, or simple syrup (optional)
Ice

Strain infused gin into 2 cold glasses, pressing out every last bit of juice from the soaked fruit and leaves. Add a bit of fresh (not gin-soaked) watermelon, lemon cucumber slices, and basil leaves, and muddle. Add tonic and ice. Add optional sweetener to taste. Stir, garnish with a cucumber slice, and enjoy!

infused gin

1/4 cup fresh watermelon, diced
1/4 cup fresh lemon cucumber slices (any variety of cucumber will do)
6-8 fresh basil leaves
1/4 cup gin (I used the already-summery
Hendrick's because it's infused with cucumber and rose petals)

Muddle the first three ingredients in a small bowl, add gin, and stir. Cover, and let sit in the refrigerator for as long as possible (the longer it sits, the more flavorful the gin will be).

(Above photo: Cocktails, ready to sip)

Tuesday, June 15, 2010

art as food as art


Welcome back to "From Brooklyn to Beacon!
" For this post, we made dishes inspired by locally exhibited works of art.

(Above photos l to r: Lick and Lather by Janine Antoni; Shadows by Andy Warhol, © The Andy Warhol Foundation for the Visual Arts, Inc. Photo: Bill Jacobson)


kate (brooklyn)

“Food Allowed in the Museum.” That was the name of a tour proposal for children that a fellow intern of mine at MoMA suggested one year while we worked at the museum together. It made total sense: between the Cezanne paintings of oranges and fruits to Claes Oldenburg’s giant foam cake sculpture there was definitely plenty of food inspiration! However, this idea was rejected and she was told it wasn’t very “serious.”

I thought my friend’s idea was an interesting one considering the history of food as subject matter in still-life paintings and sculpture, or as in artist Janine Antoni's case, food becoming the medium and the body becoming the object.

I came across Antoni’s work many years back in college and felt a connection in my own way to the different ideas she expressed through her work. I had the chance to hear her speak at the
Guggenheim last Friday and I enjoyed learning about her interest in trying new and out-of-the-ordinary materials and also how generous she was to explain her process to the audience – what had worked, what had failed, and what she had learned. Even though she spoke to a crowd of education and museum professionals, her talk could have been to a crowd of chefs, arachnologists, or demolition workers, as her work transcends many boundaries of what that we typically consider "art" and explores topics that we can all relate to. Antoni is constantly challenging herself to learn about and try new, totally off-the-wall things (such as comparing the weight and sound of a wrecking ball to the web pattern of spiders). I think that's why I like her work so much.

Currently, Antoni has a sculpture called
Lick and Lather on view at Luhring Augustine Gallery in Chelsea. The piece is made up of two self-portrait busts that she cast in chocolate and one in soap. She cast herself in alginate, a material used in dental offices for creating molds. For the chocolate bust, she melted thirty-five pounds of chocolate and poured it into the mold.

When I first saw this artwork, I couldn’t help but think of the classical Greek sculptures and how perfect in form they are (or were, before they lost parts of their arms, legs, and noses). I also think of copper or bronze sculptures in city squares that depict busts of politicians or historical figures. Antoni points to an
interview with Art 21 that “the thing about the classical bust is it’s usually reserved for depicting men and usually very powerful men, And then when we see women in classical sculpture they depict hope charity and love. I was particularly conscious of that when I made the bust and thinking about this act of erasure of this specific personality."

Antoni licked the sculpture across the face, over the cheek and over her eyes, lips, and nose. Her piece evokes different reactions and interpretations: awe, humor, shock, curiosity. I'm sure men and women have different reactions to this work. I instantly think of our ideals of beauty and how Antoni literally "erases" herself and comments on the "love-hate relationship we all have with our physical appearance."


Needless to say, it was very difficult for me to think of a way to justify this artwork with my own culinary skills. I very much admired Antoni's openness to discuss her learning process during her talk at the Guggenheim, which is something that we can all relate to: even us amateur cooks. Food is a way we express ourselves, our love, our creativity.
Having this work as part of the Chelsea gallery walk makes complete sense for a city that is both very self-conscious and always reinventing itself.

As I left the frigid Guggenheim auditorium, I walked out into the 90-degree heat and immediately needed something to cool me off. I had recently acquired an ice cream maker and it seemed like the prefect way to cool off over the weekend, which was only supposed to get warmer.


Fortunately, I didn't need to melt thirty-five pounds of chocolate. However, Antoni and I both use one similar ingredient: fenylamine. “All chocolate has fenylamine in it. That product is the chemical that’s produced in our body when we’re in love. So I think that’s why chocolate is so addictive," Antoni says.

Indeed, both art and food are addictive and intoxicating.

chocolate ice cream

adapted from
Food Network

1 1/2 ounces unsweetened cocoa powder (approximately 1/2 cup)
3 cups half and half
1 cup heavy cream
8 large egg yolks
9 ounces sugar
2 teaspoons pure vanilla extract

Place the cocoa powder along with 1 cup of the half and half into a medium saucepan over medium heat and whisk to combine. Add the remaining half and half and the heavy cream. Bring the mixture just to a simmer, stirring occasionally, and remove from the heat.

In a medium mixing bowl whisk the egg yolks until they lighten in color. Gradually add the sugar and whisk to combine. Temper the cream mixture into the eggs and sugar by gradually adding small amounts, until about 1/3 of the cream mixture has been added. Pour in the remainder and return the entire mixture to the saucepan and place over low heat. Continue to cook, stirring frequently, until the mixture thickens slightly and coats the back of a spoon and reaches 170 to 175 degrees F. Pour the mixture into a container and allow to sit at room temperature for 30 minutes. Stir in the vanilla extract. Place the mixture into the refrigerator and once it is cool enough not to form condensation on the lid, cover and store for 4 to 8 hours or until the temperature reaches 40 degrees F or below.

Pour into an ice cream maker and process according to the manufacturer's directions. This should take approximately 25 to 35 minutes. Serve as is for soft serve or freeze for another 3 to 4 hours to allow the ice cream to harden.

(Above photos l to r: Ice cream process; Finished and ready to lick/eat)


kristen (beacon)

When Kate came up with the idea for this post, I was worried. I love art, and value living in a city that is as immersed in art as
Beacon is, but for a non-artist like me, that can also be intimidating. I feel like I never quite know how to appropriately express how a piece of art makes me feel, so I’m generally quiet on the subject.

Beacon is a city that has been transformed by art. Down on its luck for the last few decades, new life was recently breathed into our city with the establishment of Dia:Beacon - a museum that houses large-scale contemporary works that cannot be accommodated by more conventional museums – and by an influx of creative, energetic, entrepreneurial, and artistic folks who have relocated from New York City and other areas to open innovative galleries, stores, and studios. The artistic vibe is one of the reasons BPJC and I moved to Beacon, too. Being around such creativity and innovation is constantly inspiring and uplifting.

But even amidst all of this awesomeness, I was nervous about making food inspired by a work of art in town. Would it be cliché, I wondered? Probably. Would I fail to express how I really feel about the art? Most likely. Should I just forge ahead with an open mind and see how I fare? Absolutely.

The first time I visited the Dia, I was blown away. It's not the kind of museum you expect to find in a small city like ours. It is special in ways that I cannot adequately describe (you’ll have to come and see for yourself). One of my fondest memories of that first visit (and subsequent ones) was walking into the massive room that houses Andy Warhol’s Shadows, which is a series of paintings in 102 parts. I sank into the couch in the middle of the room, and stared for what seemed like hours. I was transfixed.

I don’t pretend to know what the images in the paintings are, but the colors and how they work together are jarringly beautiful. Warhol used 17 hues in the piece, and according to Dia:Beacon’s website they range from a “Day-Glo acid green to a majestic purple, from a lurid turquoise to a sober brown.” It’s a strange, glorious combination.

Shadows is the first thing I think of now when I think of the Dia, so I had to choose it for this post. And naturally I had to make a cake. A cake with lots of layers and Shadows-inspired colors. I wanted to make 17 layers to represent each hue, but I needed it to stay (somewhat) upright, so only made 6. The cake, which was filled with dark chocolate buttercream and then frosted with vanilla bean buttercream, took about 4 hours to make and assemble, but it was worth it. It stained our teeth bright colors and may have been a bit too sweet, but it sparked a lively conversation about the art.

Working on this post helped me to realize that art is relative. I don’t need to be an expert, or to say something wildly intelligent about a work of art for it to be true. We all interpret and appreciate it in our own way, and should never be ashamed of that.

rainbow cake
adapted from Whisk Kid

2 sticks butter (at room temperature)
2 1/3 cups sugar
5 egg whites (at room temperature)
2 teaspoons vanilla
3 cups flour
4 tsp baking powder
1/2 tsp salt
1 1/2 cups milk, warmed for 30 seconds in microwave to bring to room temp
Food coloring

Preheat the oven to 350 degrees. Butter and line how ever many 8-9” cake pans you have (I have two and just reused them).

Sift together the flour, baking powder and salt. Set aside.

Cream the sugar and butter, then add the egg whites and add them a little at a time. Add the vanilla and mix until fully incorporated. Then, alternating between wet and dry, add the milk and flour mixture in two parts.
Divide the batter amongst 6 bowls and then whisk a fair amount of the appropriate food color into each bowl. Pour into the pans (I didn’t fill the pans over halfway) and bake for 15 minutes each. When you remove them from the oven, let them rest on the cooling rack, in the pan, for ten minutes. Then flip, cover, and stash them in the fridge to cool quickly.

dark chocolate buttercream frosting

5 1/3 cups confectioners’ sugar
1 1/2 cups unsweetened cocoa powder
1 tbsp instant espresso powder
12 tbsp butter
10-11 tbsp milk
2 tsp vanilla

Combine confectioners' sugar and cocoa in a small bowl. Cream butter with 1 cup of the cocoa mixture in a small bowl. Alternately add remaining cocoa mixture and milk; beat to spreading consistency. Stir in vanilla.

vanilla buttercream frosting
adapted from Billy's Bakery

4 sticks unsalted butter, room temperature
12 to 14 cups confectioners’ sugar
1 cup milk
2 teaspoons pure vanilla extract
Scrapings of 1 vanilla bean

In the bowl of an electric mixer fitted with the paddle attachment, cream butter until smooth and creamy, 2 to 3 minutes. With mixer on low speed, add 12 cups sugar, milk, and vanilla; mix until light and fluffy. If necessary, gradually add remaining 2 cups sugar to reach desired consistency.

(Above photos l to r: Frosting the colorful layers; Digging in)

View more of our photos from this post on Flickr.

Monday, May 10, 2010

brief hiatus

Hello, friends. We are taking a brief hiatus from blogging for the month of May, but will resume posting in early to mid June. Stay tuned, and thank you so much for reading!

Sunday, April 18, 2010

our bread


For this post, we were inspired by Jim Lahey (of Sullivan Street Bakery) and his new book, My Bread. In the book, Mr. Lahey describes his now-famous "no work, no-knead method" of bread baking, which involves "flour, water, and time" and a Dutch oven. Read his recipe for basic no-knead bread and our interpretations of it below.

basic no-knead bread
from My Bread by Jim Lahey
Makes one 10-inch round loaf; 1 1/4 pounds

Equipment: A 4 1/2-5 1/2-quart heavy pot

3 cups bread flour
1 1/4 teaspoons table salt
1/4 teaspoon instant or other active dry yeast
1 1/3 cups cool (55 to 65 degrees F) water
Wheat bran, cornmeal, or additional flour for dusting

In a medium bowl, stir together the flour, salt, and yeast. Add the water and, using a wooden spoon or your hand, mix until you have a wet, sticky dough, about 30 seconds. Make sure it's really sticky to the touch; if it's not, mix in another tablespoon or two of water. Cover the bowl with a plate, tea towel, or plastic wrap and let sit at room temperature (about 72 degrees F), out of direct sunlight, until the surface is dotted with bubbles and the dough is more than doubled in size. This will take a minimum of 12 hours and (Mr. Lahey's preference) up to 18 hours. This slow rise - fermentation - is the key to flavor.

When the first fermentation is complete, generously dust a work surface (a wooden or plastic cutting board is fine) with flour. Use a bowl scraper or spatula to scrape the dough onto the board in one piece. When you begin to pull the dough away from the bowl, it will cling in long, thin strands (this is the developed gluten), and it will be quite loose and sticky - do not add more flour. Use lightly floured hands or a bowl scraper or spatula to lift the edges of the dough in toward the center. Nudge and tuck in the edges of the dough to make it round.

Place a cotton or linen tea towel (not terry cloth, which tends to stick and may leave lint in the dough) or a large cloth napkin on your work surface and generously dust the cloth with wheat bran, cornmeal, or flour. Use your hands or a bowl scraper or wooden spatula to gently lift the dough onto the towel, so it is seam side down. If the dough is tacky, dust the top lightly with wheat bran, cornmeal, or flour. Fold the ends of the towel loosely over the dough to cover it and place it in a warm, draft-free spot to rise for 1 to 2 hours. The dough is ready when it is almost doubled. If you gently poke it with your finger, making an indentation about 1/4 inch deep, it should hold the impression. If it doesn't, let it rise for another 15 minutes.

Half an hour before the end of the second rise, preheat the oven to 475 degrees F, with a rack in the lower third position, and place a covered 4 1/2-5 1/2-quart heavy pot in the center of the rack.

Using pot holders, carefully remove the preheated pot from the oven and uncover it. Unfold the tea towel, lightly dust the dough with flour or bran, lift up the dough, either on the towel or in your hand, and quickly but gently invert it into the pot, seam side up. Cover the pot and bake for 30 minutes.

Remove the lid and continue baking until the bread is a deep chestnut color but not burnt, 15 to 30 minutes more. Use a heatproof spatula or pot holders to carefully lift the bread out of the pot and place it on a rack to cool thoroughly. Don't slice or tear into it until it has cooked, which usually takes at least an hour.

(Above photos l to r: First bite of Kate's bread; Kristen's bread smeared with goat cheese and lemon and topped with roasted asparagus)


kate (brooklyn)

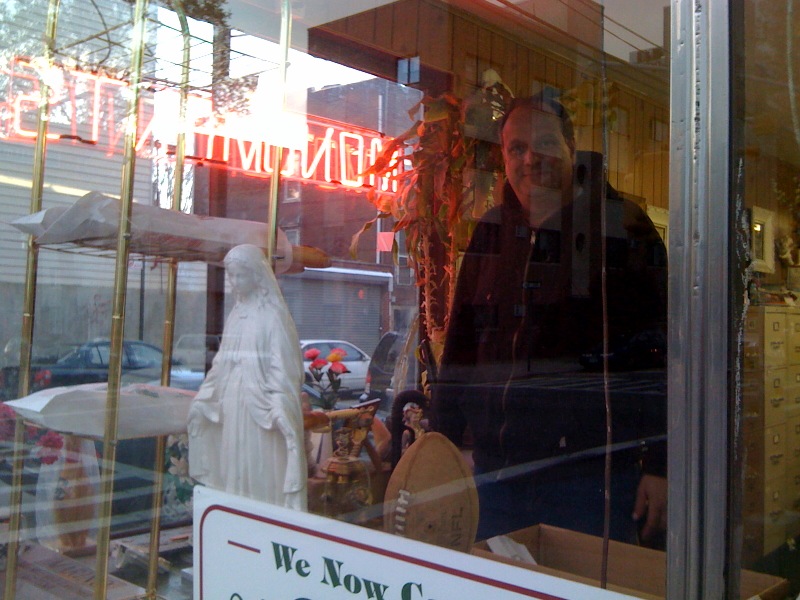
Tuesday evening, 6:35 PM. I hurry up the subway stairs and walk quickly down Graham Avenue in Williamsburg, hoping Grande Monuments is still open. I see the bright red neon "Monuments" light in the window. I pop my head into the door.

Just a minute... Grande Monuments? Yes, it's a tombstone store. However, I'm not in the market for a headstone. I'm going there to buy a delicious baguette for dinner. "Have you got any bread left?" I ask. "You bet," Jerry said as he pointed to a few baguettes lying on top of a grey flecked granite tombstone and handed me a fresh loaf.

I stop by Grande Monuments once or twice a week after work to purchase a loaf of two of bread. In my opinion, it's the best bread nearby and also perhaps the most peculiar. "I just have to ask," I say to Jerry, "bread and tombstones? I just don't get it. How did this get started?"

Jerry smiled and sat back on a headstone and told me his story. His cousin is the owner of a bakery in Bensonhurst called Il Fornaretto, where his 19-year-old daughter, Angela, also works. In the early days, she would bring home extra loaves after a day at the bakery and Jerry would share them with people in the community, including the nuns who lived around the corner. Pretty soon the priest from the church was ordering loaves for the congregation. People were coming by the shop and asking for more bread. The business took off from there.

Jerry puts his loaves in the window right next to a statue of the Virgin Mary. They are not easy to resist, despite your beliefs. I literally had to do a double take when I first saw them; it seemed like such an odd combination.

Jerry told me that one thing he really enjoys about selling the bread in his shop is that he gets a chance to work with his daughter. They started a savings account for her with the profit they made from the bread they sold each day. The bread experience gives them a little time to chat and get to know each other, since communication with teenagers, as Jerry mentions, "can be a bit tough." He really values this experience and hopes his daughter will one day come to work for the family business. "She went to a funeral the other day," he said with hope. You can tell that he's really proud of his daughter and the unique and lively business they created in their neighborhood. I imagine it's the kind of place you'd only find in Brooklyn.

Baking bread is definitely a talent and something that I never though I had the skills for until I tried Jim Lahey's recipe. I've tried making bread in the past, most recently a whole wheat loaf that could have been mistaken for a brick and perhaps used as a small weapon. There was always a lot of work and waiting... it seems so much easier to just go out and buy a loaf at the store.

This recipe doess require a bit of time: 12-18 hours! I found it best to make the dough the night before and to then continue to recipe the following afternoon so it can be finished a few hours before dinnertime. It's all about timing. There are only a few simple ingredients and barely any elbow grease needed! The bread slides easily out of the bowl after the first rise with the help of a spatula. And once the bread has finished baking you will just dive in and enjoy every bite. It's hard not to eat the whole loaf!

Anyone can try this and you'll want to keep baking it over and over and trying new variations. I have a whole wheat loaf rising in the kitchen as I write this. I can't wait to try many of Jim Lahey's other no-knead, one pot bread recipes.

(Above photos top and l to r: Jerry at Grande Monuments; Ready for second rise; Afternoon snack)


kristen (beacon)

I’ve always wanted to be a prolific bread baker. I daydream about being the kind of woman who is covered in flour and sweat every Saturday afternoon, my kitchen warm from the oven.

However, I’ve always been slightly intimidated by making my own bread. It seems like such an exact science, one that I would surely get wrong in my haphazard way of doing things. I can’t even make a decent pie crust, so how would I be able to turn out an edible loaf of bread? In the past, I’ve left the bread making to the professionals.

Fortunately, in Beacon, a loaf of freshly-baked artisan bread is not too hard to find. Beacon does not have a dedicated bakery, but we do have an incredible cafĂ©, Homespun Foods, that sells exceptional baked goods and bread. A large selection of Homespun’s bread is made right in town by Beacon residents Simone and David from All You Knead, a small bread making operation based in a classroom-turned-baker’s-kitchen at the old Beacon High School. Simone and David’s bread is crafted with love and chock full of local grains from Lightning Tree Farm in Millbrook. In addition to Homespun Foods and Adams Fairacre Farms, they sell their loaves each Sunday at the Beacon Farmers Market. Wendy from The Locavore Baker, another bread making operation in Beacon, mills local, organic grains and bakes bread right in her own kitchen. This year, for the first time, she will be offering bread shares to members of our local CSA, Common Ground Farm.

Simone, David, and Wendy are making incredible bread. Right here in my town. One in her very own kitchen. Maybe bread making doesn’t have to be so scary and hard? If they can do it right here in Beacon, can I?

Jim Lahey makes bread making easy for amateurs like me. His book is a beautiful thing. It’s full of gorgeous how-to photos, charming stories, and very approachable methods. It makes me want to bake my own bread over and over. I have a feeling it’s going end up being one of those cookbooks that is perpetually covered with flour and smeared with butter… you know… the best kind.

I was excited to try his recipe, so I dove headfirst into the 20+ hour long process without even thinking about the timing. I mixed my ingredients together and started the first rise on a Saturday morning, which meant that Step 2 would arrive at 4:30 AM the following morning. Smart, Kristen. Very smart. At least my 4:30 AM wake-up call was greeted with the most amazing bread dough smell ever. After a dusting of wheat bran, I wrapped the dough in a tea towel, in which it rose for another two hours. Finally, the soft, aromatic dough was ready for a go in the Dutch oven. Bleary eyed, I popped the bread into the oven and waited.

Less than an hour later, the bread was on the counter, deeply golden and whistling and crackling. I felt such a sense of accomplishment! It looked so professional and smelled heavenly. After several hours of allowing the flavors to develop, PJ and I tore into the loaf and smeared slices with goat cheese mashed with lemon zest, lemon juice, salt, and pepper, and layered them with roasted asparagus (a la shutterbean). We poured ourselves a beer and took a seat outside. The flavor of the bread was deep and tangy and matched well with the sharpness of the goat cheese and the woodsy asparagus.

I think it’s safe to say I’m hooked, and I’ll be baking loaf after loaf of Mr. Lahey’s bread. Come on over on any given Saturday afternoon for a slice.

(Above photos l to r and underneath: Dough, ready for baking; Fresh out of the oven; Simone from All You Knead)

View more of our bread photos on Flickr.

Friday, April 2, 2010

visiting: brooklyn


For this post, we spent a day together and shared a meal in Brooklyn. Read about our day and the ensuing deliciousness below.

(Above photos l to r: Kate and Branden's table; A sweet message in Brooklyn)


kate (brooklyn)

Spring was finally on its way. Time to put away those heavy coats and bulky sweaters and pull out the sunglasses and lighter colors. At least I thought that 'til last week when the coats came back out of the closet and our heat finally started coming on full-blast in our apartment for the first time since we moved in. March really couldn't make up its mind whether to be a lion or a lamb.

Kristen and PJ drove down to Brooklyn from Beacon on a warm and glorious 70-degree middle-of-March day. Unlike the unending rain and thunderstorms that took over the day/night of our last dinner party, the sky was clear and the sun was quite warm. I got up early that morning and had a chance to run into the city to get some last minute things at the Union Square Greenmarket and Fishs Eddy (upon realizing we didn't have enough plates or bowls to serve our guests). Seeing a glimpse of colorful flowers under the tents in the market gave me a burst of energy: Winter was finally over and warm weather would save us all.

I wanted to spend as much time with my guests as possible on Saturday afternoon, so I cooked the main meal, a Spring vegetable stew, the night before. Soup always tastes better the second day, and it would be something quite easy to heat up and serve to a crowd of 6. I couldn't find every ingredient I needed for the soup, but luckily the recipe was very forgiving (as you'll see below) and allows for a lot of creativity.

Everything seemed to be going well, until I made the hot pink cupcakes. Or, perhaps, I should refer to them as the hot pink mess. Everything was pretty much a disaster: the cake part tasted weird and spongy and the icing was so bright and tasted like an over-sugared Easter bunny toothpaste. Luckily, my friends, Jannine and Nathan, came to the rescue and brought delicious cookies from the East Village. Branden came up with some amazing appetizers: sweet pea guacamole, Jerusalem artichokes, and hummus. Kristen and PJ topped off the meal with some great wine from the Hudson Valley. One of my favorite things about the night was how we all contributed a bit to the meal in our own way, and it seemed the perfect way to celebrate a first glimpse of Spring.

I didn't even realize that the main course was from the Hudson Valley Mediterranean cookbook, which focuses on seasonal ingredients and highlights farms and small businesses in the Hudson Valley. I wonder if Kris and PJ will make some Brooklyn-ish for us when we come up to Beacon to visit them... ?

spring vegetable soup
adapted from
Hudson Valley Mediterranean
Makes: 6 servings

This classic summer vegetable stew is referred to as "ratatouille." What could be better than cooked down tomatoes, summer squash, eggplant, onions, garlic, and herbs? With its many delicate flavors, this Spring stew eases us away from the root vegetables of Fall and Winter and toward a Summer with bold flavors.

2 large lemons, halved
4 medium artichokes * (I used canned artichokes and you could also substitute frozen for fresh ones)
2 shallots, thinly sliced
9 small red potatoes (1 to 2 inches in diameter), quartered
1/2 cup dry white wine
3 cups vegetable or chicken stock or reduced sodium broth
12 fresh asparagus spears, trimmed and sliced on the diagonal into 3/4-inch pieces
1 cup fresh or frozen peeled fava beans (I substituted edamame)
1 cup shelled peas (fresh or frozen)
1/4 cup snipped chives
1/4 cup chopped fresh flat leaf parsley (you may also substitute basil or tarragon)
3 tablespoons finely grated Grana Padano or Parmesan cheese
Salt and freshly ground black pepper
Shaved Grana Padano or Parmesan cheese, for garnish

* (If you decide, like me, to work with frozen or canned artichokes, begin reading at 3rd paragraph)

Fill a large bowl with 1 quart of water, and squeeze two lemon halves into it. Add the squeezed lemon halves to the water.

Working with one artichoke at a time, bend back the outer leaves close to the base until they snap off where they break naturally. Discard the layers until the exposed leaves are pale green at the top and pale yellow at the base. Using a small sharp knife, trim the stem and the base until it is smooth and no dark green areas remain. Trim the leaves. Rub the base with the remaining lemon halves. Cut the artichoke lengthwise into 4 wedges. Using a small knife, cut out the choke and the small purple-tipped leaves, then halve again for a total of 8 wedges. Place the artichoke wedges in the lemon water.

Heat the olive oil in a large skillet over medium heat. Add the shallots and cook, stirring often, until softened, about 3 minutes. While the shallots are cooking, drain and rinse the artichokes. Add the artichokes and the potatoes to the skillet and cook, stirring for 1 minute. Pour the wine and simmer until the liquid is reduced to a few spoonfuls, about 6 minutes. Add the stock and bring to a boil. Add half of the asparagus, fava beans, peas, cover the skillet, and simmer the stew for 10 minutes. Stir in the remaining asparagus, fava beans and peas, 2 tablespoons of the chives, and 2 tablespoons of the parsley. Let the mixture simmer, partially covered, for about 4 minutes, or until the potatoes and artichokes are tender. Stir in the remaining herbs and the grated Grana Padano, and season with salt and pepper to taste. Serve topped with shaved Grana Padano.

(Variations: Serve the soup over orzo or with your favorite pasta, or add chicken or sausage. I added green chorizo from The Meat Hook... yum!)

jerusalem artichokes appetizer
adapted by Branden from his friend, Neil

The Jerusalem artichoke (Helianthus tuberosus), also called the sunroot, earth apple or topinambur, is a species of sunflower native to the eastern United States, from Maine west to North Dakota, and south to northern Florida and Texas. It is also cultivated widely across the temperate zone for its tuber, which is used as a root vegetable. (Source: Wikipedia)

4 fresh artichokes or 1 can full
Olive oil
Salt and freshly ground black pepper
Parsley
Parmesan cheese

Leaving skin on, slice artichokes thinly. Add oil, pepper and salt. Thinly sliced fennel is also nice to add to each slice. Put a sprig of fresh parsley on each slice and sprinkle with Parmesan cheese.

sweet pea guacamole
adapted from
Hudson Valley Mediterranean
Makes: 6-8 servings

2 tablespoons sugar
1 tablespoon salt
2 cups shelled fresh peas (or frozen peas, thawed)
1 tablespoon fresh mint
1/4 cup extra virgin olive oil
Freshly ground black pepper

Bring 1 quart of water to a boil in a medium saucepan. Season the water with the sugar and salt, then add the peas. Boil for 4 to 5 minutes, untol the peas are tender and bright green (if using frozen peas, cook for only 1 minute).

Meanwhile, prepare an ice bath by filling a medium bowl 3/4 full with ice cubes and water.

Drain the peas, reserving 1 cup of the cooking liquid. Transfer the peas to the ice bath and let them cool completely. Then drain the peas and add them to a food processor along with 1/3 cup of the reserved cooking liquid and the mint. Pulse to combine. Scrape down the sides of the bowl to make sure all of the peas hit the blade. Turn the motor on and add more of the cooking liquid, a little at a time, through the feed tube to work the peas into a thick puree with the consistency of guacamole. With the motor still running, drizzle the olive oil through the feed tube. Adjust the seasoning with more salt, if necessary, and pepper, and transfer the guacamole to a serving bowl. Serve with pita, crostini, or crackers.

(Above photos l to r: Colors along a walk in Greenpoint; The Brooklyn Standard)


kristen (beacon)

Brooklyn is a magical place.

Its energy is palpable. The colorful graffit at every turn, the easy pace of Greenpoint, the volume of Williamsburg, the Italian food in Bay Ridge, the Chinese food in Sunset Park, the majestic homes of Dyker Heights, the hot dogs and rollercoasters in Coney Island, matzo ball soup in Borough Park, the cobbled and cavernous streets in DUMBO, the borscht in Brighton Beach, the beer gardens in Red Hook, the young families in Park Slope, and Prospect Park. Who could forget Prospect Park?

Beacon reminds me of Brooklyn. A tiny cross-section of it, dropped right into the middle of the scenic Hudson Valley. Perhaps that's why I love it so much.

When Kate and Branden invited me and PJ to Brooklyn for a meal, we could not refuse. They recently relocated from Williamsburg to Greenpoint, and we were anxious to see their new neighborhood and apartment, and were even more anxious to share a meal with them there.

Just like the two of them, their apartment is warm, easygoing, and splashed all over with color and life. They make such a good team, and their home is a true reflection of that. While Branden worked on making the appetizers, Kate took us on a walking tour (a.k.a. quest for ingredeitns) of Greenpoint and parts of neighboring North Williamsburg. After stops at The Met grocery store, The Brooklyn Standard, The Brooklyn Kitchen /The Meat Hook, and Settepani, we arrived back to the apartment with a fresh loaf of filone (which we learned is half white/half wheat bread), a bunch of kale, a new cutting board (for us), aromatic sausage, kombucha (Kate's favorite), and a really strange bag of Asian cracker mix that tasted a bit too much like teriyaki chicken. We also walked through the gorgeous and historic McGolrick Park, which lies just around the corner from Kate's apartment. In the center of the park stands a majestic pavilion that was built in 1910 and looks as if it's barely been touched by the effects of time. Daffodils and crocuses were popping out everywhere and kids were skateboarding and playing spirited games of baseball on the concrete.

For dinner, we were joined by Jannine and Nathan, two lovely folks who enjoy good food as much as we do. We all dove (literally, almost) into Branden's homemade kale chips (which were perfection) and sweet pea dip (which was fresh and green and delicious). Then, we gorged ourselves on a healthy and hearty Spring vegetable soup over orzo. Coincidentally, the dip and soup recipes came from one of our favorite go-to local cookbooks, Hudson Valley Mediterranean. For dessert, we had Kate's vanilla-and-hot-pink cupcakes (which were delicious no matter what she says) and a box of just-baked cookies that Jannine and Nathan brought from Birdbath Neighborhood Green Bakery in the East Village.

Dinner (and the entire day) was refreshing, creative and easygoing. Just like Kate and Branden. Just like Brooklyn.

(Above photos l to r: Cow statue at The Meat Hook; Fresh filone from Settepani)

View more of our Brooklyn photos on
Flickr.